Swiss Chard Tart with Pine Nuts and Raisins

The end of February marked the 3 year anniversary of this blog. On 2/21/2011 I wrote my first post, about an eggplant dish I made from one of the first vegetarian cookbooks I bought after Michael decided to eat vegetarian.
I have been reflecting about my motivation on writing here, posting recipes, taking pictures of my food, and honestly felt a bit demotivated about it all for quite some time now. Nothing good can come from comparing your writing, your recipes, your pictures and your life in general to that of other bloggers.

I’ll spare you all the self-criticizing thoughts I had in the past weeks/months, because what I mainly want to say today is: I just love to cook. Basta. That is the reason I started writing here those 3 years ago and still, this is the reason I come back to this space after being absent, again, for quite some time.
I realize it is already March, but back on New Year’s Eve Michael and I talked about the highlights of 2013, and mentioned Marcella Hazan’s Torta di Biete, or Chard torta as one of the best things I had made in 2013. It’s been a while since New Year’s Eve, so I am really sorry to have kept this recipe for myself for so long. (Although it is published in The Essentials of Classic Italian Cooking, so it is hardly a secret) You really should have had the opportunity to make this since January 1st, with Swiss chard being in season and all.
The original torta is crustless, but there is a whole mess of toasted breadcrumbs involved. You could definitely make the recipe as Marcella Hazan wrote it (I found a closer version to the original here) and there is absolutely nothing wrong with it with this sort of breadcrumb crust. I came to prefer the version with a crust though, if only because the crust makes it easier to steal a slice here or there out of the fridge.

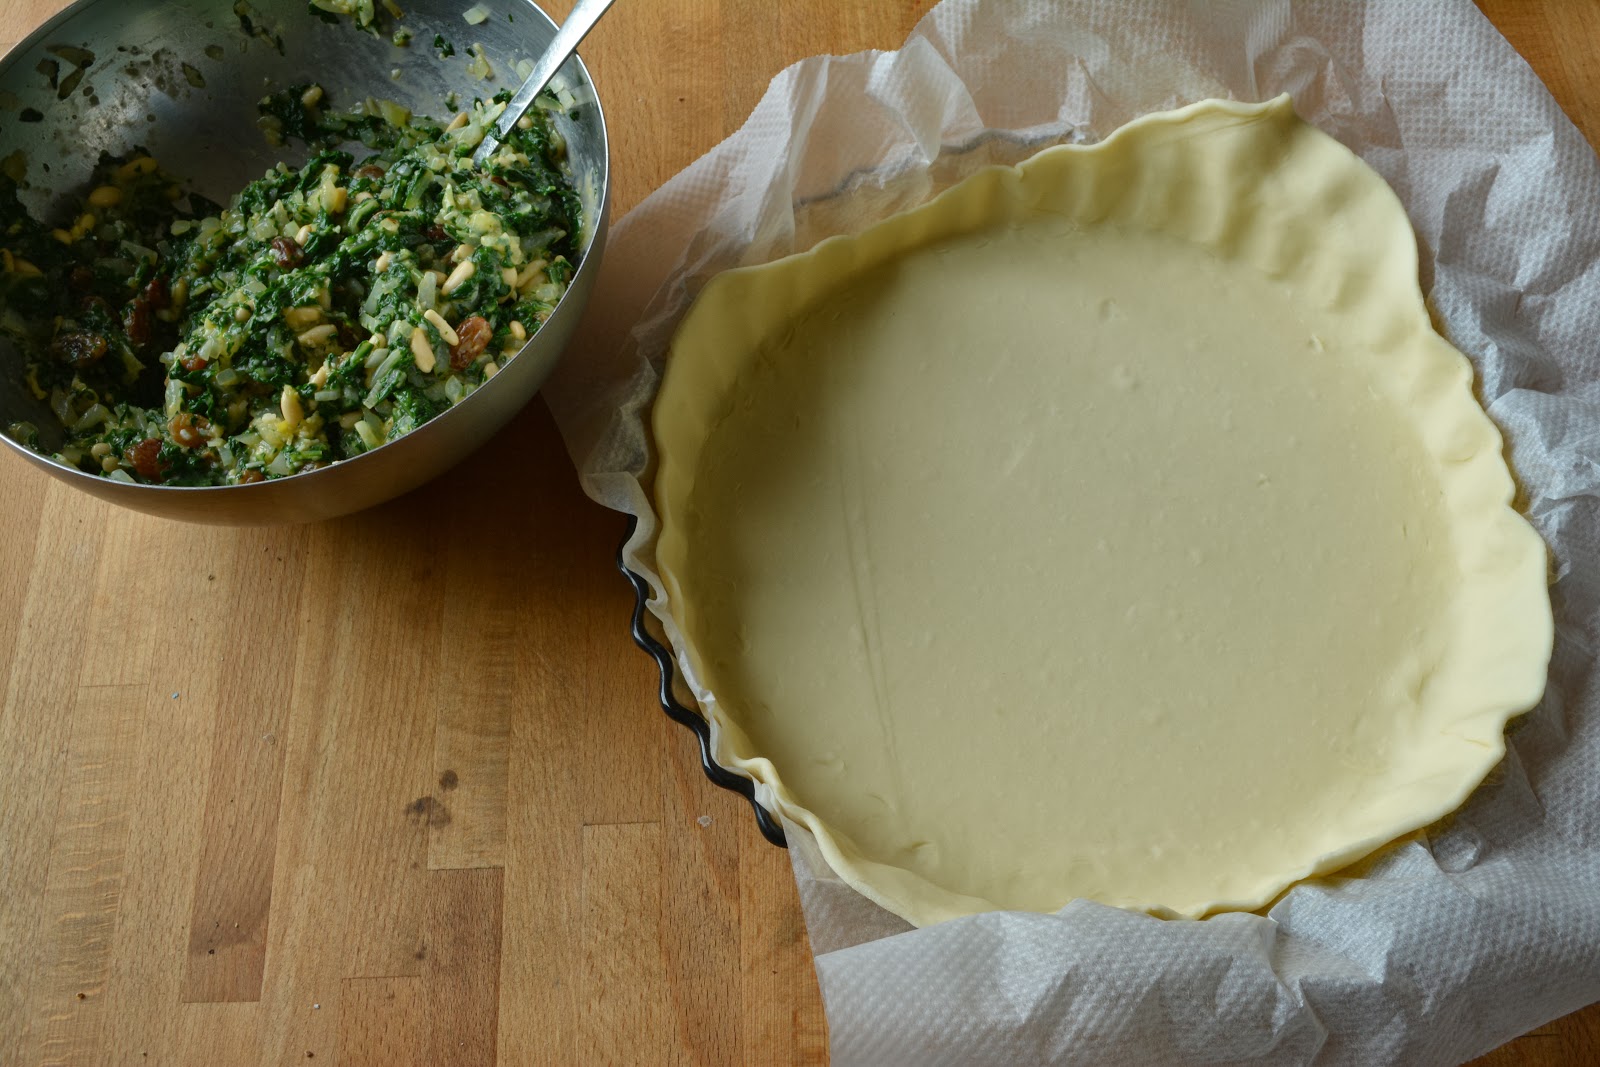
Swiss Chard and Onion Tart with Pine Nuts and Raisins
Adapted from Marcella Hazan’s Swiss Chard Torta with Pine Nuts and Raisins
Note: The raisins are essential, in my opinion, but if you dont like them, maybe you could subtitute dates. Also, I never blind bake my tart crusts, but if you usually do, I suggest 20 minutes of prebaking while you prepare the filling.

400g Swiss chard, leaves only (I bought 1,2 kg of chard to get 400g leaves, but this varies depending on how thick the stalks are. I’d err on the side of buying too much Swiss chard, I think you’ll have no troubles fitting in even 500 or 600g of the wilted leaves into the tart)
4 tbsp pine nuts
6 tbsp raisins, covered with water
1 tart dough, rolled out (here I used a store bought version, but I also make this olive oil tart dough by Tamar Adler)
1 yellow onion, finely chopped
4 tbsp olive oil
50g freshly grated Parmesan
2 eggs
pepper

Start with bringing a big pot of salted water to a boil. Preheat the oven to 180°C/350°F. Prepare the tart crust, roll it out and fit it into a 9 1/2 inch/25cm tart pan.
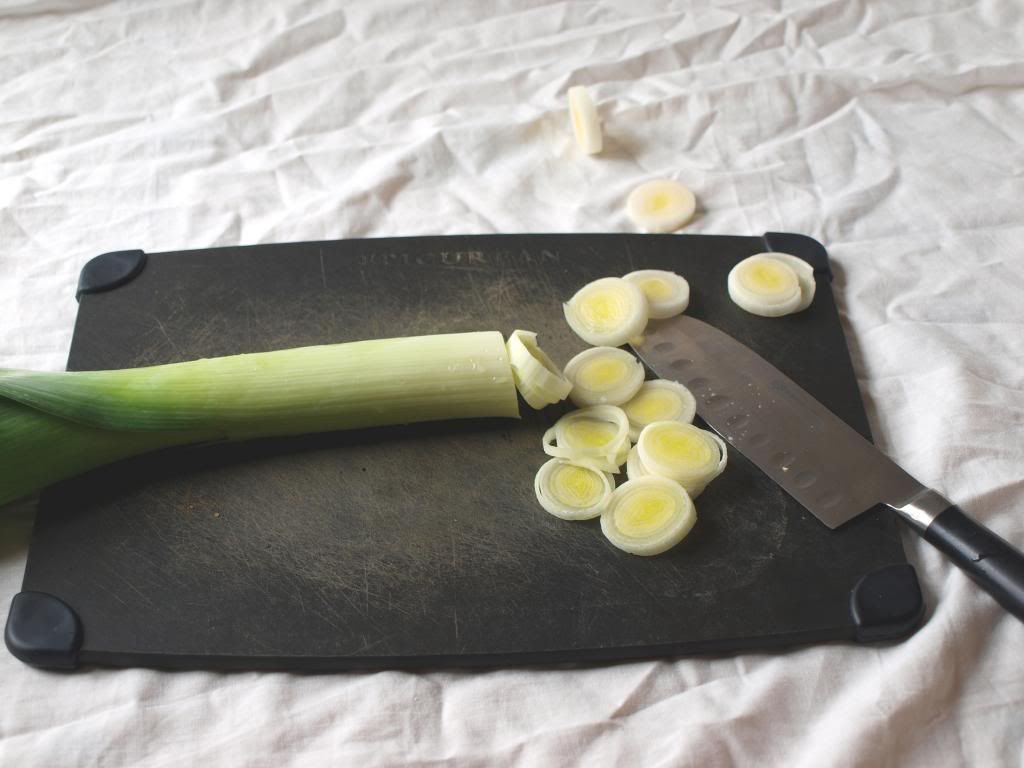
Remove the ribs of the chard, and set them aside to use in another recipe. Roll the leaves up and cut them into strips about 1 cm wide. (This does not have to be to accurate, you are going to chop them up further later on)
Wash the chard leaves really well in a kitchen sink filled with water. Drain and repeat if necessary.
Once the water comes to a boil, drop in the chard and cook for 5 minutes, or until tender. Drain and set aside to cool for a bit.
When the chard is cool enough to handle, press out any remaining water, forming it into sort of burger patties. On a cutting board, chop these patties like you would and onion, then press out again to remove even more water. Set aside.
In a skillet, heat up the olive oil on medium heat. Sauté the onion until translucent, and fragrant, about 5 minutes. Stir in the chopped up chard and stir well. Sauté for another few minutes to let the chard dry off even more. Remove from heat and let cool down.
In a mixing bowl, mix together the grated Parmesan, drained raisins, pine nuts, cooled down chard mixture and the eggs. Add a few grinds of pepper. Pour this filling onto the prepared tart crust, put in the oven and bake for 30 minutes.

Serves 4.

A few ideas for the stalks of the Swiss chard:

  • I have made a white lasagna, slicing the stalks into 1-2 cm thick pieces,  boiling them, throw them into a Bechamel sauce and layering that over lasagna noodles.
  • Today I made a sort of Swiss chard Parmiggiana, layering the also preboiled chard stalks with tomato sauce and some Parmesan and baking that.
  • The stalks are also good in a vegetable ragout with some tomatoes, other veggies and a little smoked paprika. 

Buckwheat + Carrot Salad with Ginger and Sesame

This salad feels so summery to me, which suits my longing for the warmer days of spring and summer. We had a not so cold winter so far here, almost no snow the entire november/december/january – which means that those winter months were mostly just dark and dreary, without the snow that serves as a natural reflector and those wonderful blue skies that sometimes come with it.
Consequently I am longing for the warmer days of spring and summer, and I feel like this salad of buckwheat and carrots can sort of satisfy my fantasy of a picknick in a park on a warm summer night (a picknick I actually never have, not even in summer, but it just sounds so dreamy)

The buckwheat that went into this salad had been in my kitchen way too long before I used it today, me always lacking inspiration on what to do with it. Maybe you have a deserted bag of buckwheat groats in your pantry, too? Despite never cooking it, I actually really like the taste buckwheat has. Since they logically taste like Soba noodles (which are made with buckwheat flour), I decided to pair the cooked buckwheat with what I consider Japanese ingredients (ginger, soy sauce, scallions, sesame), though I don’t actually know what I am talking about.
And with that, I had a summer fantasy in a bowl for dinner and feel optimistic that summer is near (Michael proclaimed February 1st the beginning of summer, and I am inclined to view it that way, too.)

Are you looking forward to summer, too? Or are you happy in the cold of winter?

Buckwheat Carrot Salad with Ginger and Sesame

1/2 cup uncooked buckwheat
3 carrots
1 scallion
1 knob of ginger, the size of half your thumb or so, grated
1 tbsp soy sauce
1 tbsp sesame seeds
1 tbsp black sesame seeds

Start cooking the buckwheat in plenty of lightly salted water. Drain when tender, after about 20 minutes and set aside to cool.
Roast the scallion either in the oven (mine was already on) or in a cast iron skillet until slightly charred and tender. Cut into slices
Cut the carrots into ribbons, using a vegetable peeler.
Mix the buckwheat, carrot ribbons and the scalllion slices in a bowl (or in the pan you cooked the buckwheat in) and add the grated ginger and the soy sauce.
Toast the sesame seeds in a dry skillet over medium heat until the white seeds start to brown. Add to the salad and mix.

Serves 2-3.

Chou Grillé + Spain

I started this post back in December, when I thought it was strange of me to post a salad recipe just before Christmas when everyone (including myself, obviously) is eating way too much. And then I left Switzerland to visit Spain (Bilbao, Madrid and a few smaller places inbetween) and ate so.much! Spain is not the best country to travel to as a vegetarian, but we always found something to eat, and had a few wonderful Pintxos in Bilbao that I think I want to recreat now that I am home. (I still have to get over my reluctance to deep frying for that though, it is a miracle the Basque don’t also fry the bread that is the base for all the lovely pintxos they serve)

But now I am back home, and craving salad and greens and vegetables and good pasta like a crazy person. I am not one to make New Year’s resolutions, mostly because I know I can in no way ever keep them, so please don’t look at this sort of kale salad as something you have to get yourself to eat now that it is January and the pants are tight and you are starting to plan your summer holidays.
This salad of sorts is the other gem Amy, Nicole and I had at Le Mary Celeste back in November in Paris and it is one of the best things I ate last year. Carrots and cabbage are such humble ingredients, but together with the spicy dressing the taste anything but virtuous. This is a dish I think about often, you really should give this a try!

Roasted Kale and Carrots in Chili Bean Sauce
Note: Adjust the amount of chili bean sauce depending on how spicy you like it. And as you see in the title, this dish was originally called chou grillé, so if you have any way of grilling the carrots and cabbage, please give it a try. I don’t so I did not test it, but I imagine you’ll have to precook the carrots and cabbage for a bit longer to avoid having charred carrots that are still hard inside.

1 pound carrots, peeled, cut into pieces about 3-4 cm long (if they are huge, you might want to cut the pieces in half or quarters)
1 pound kale or savoy cabbage, the cabbage leaves cut into strips (I actually preferred the cabbage version I made the first time, but kale is lovely too)

1 tbsp chili bean sauce
1 tbsp chinkiang vinegar
1/2 tbsp soy sauce

2 tbsp pumpkin seeds

Start with bringing a pot of salted water to boil and precooking first the carrots for 2 minutes, remove with a slotted spoon and then the cabbage for 1 minutes.  Let them cool down and dry before proceeding.
Preheat the oven to 180°C/350°F. Add the carrots and cabbage to a bowl, drizzle with a little olive oil and salt massage the olive oil into the leaves of the cabbage. Put the vegetables on a baking sheet and roast until the carrots are fairly brown (for about 40 minutes). If the cabbage leaves seem to be getting to dark, remove them and finish roasting them.
In the meantime, wisk together the chili bean sauce, the vinegar and the soy sauce.
In a small skillet, toast the pumpkin seeds until you hear them pop.

While the carrots and the cabbage are still warm, drizzle on the dressing and mix well. Sprinkle on the pumpkin seeds and serve.

Serves 4 or so as a salad.

Fall Minestrone

Autumn Day

Lord: It is time. The summer days were grand.
Now set your shadows out across the sun-dials
And set the winds loose on the meadowland.
Bid the last fruits grow full upon the vine,
do them the good of two more southern days
then thrust them on to their fulfillment, chase
the final sweetness into bodied wine.
Whoever has no house yet will build none,
Whoever is alone will stay alone
And stay up, write long letters out, and go
Through avenues to wander on his own
Uneasily when leaves begin to blow.
Rainer Maria Rilke (Translated by A.Z. Foreman)


And to go with the poem I love so much, here is a autumnal minestrone, to enjoy on one of those short and somewhat dreary fall days we happen to have here. (Though the temperatures are supposed to go up for the weekend, yay!)

Fall Minestrone
Adapted from the minestrone alla romagnola by Marcella Hazan, and this minestrone I found on the Dinner: a Love Story blog.

120g dry cannelini beans (or 400g of the canned variety)
1 bay leave
salt

8 tbsp olive oil30g butter
3 onions, sliced
4 carrots, diced
2 stick celery, diced
2 large fennel bulb, diced
200g potatoes, peeled, cut into small squares
150g shredded Savoy cabbage
150g Swiss chard, chopped into small pieces
1,5l vegetable broth, or bean cooking water (but do not use the liquid that is in the cans, if using canned)
160g canned, whole Italian tomatoes
1/2 tsp smoked paprika (optional, if you don’t already have it at home)
parmesan crust (optional)
parmigiano-reggiano to serve

If using dried cannelini beans: Cover the beans with 3cm of water and let soak over night.  In the morning, or before starting your soup, cook them, adding a bay leave, salt and some smoked paprika, until done, for about an hour. Set aside the cooking liquid to use as the broth for this soup.
In a large saucepan, put the olive oil, butter and onion on low-medium heat. Let the onion cook, uncovered, until it becomes soft and fragrant and starts to colour slightly.
Add the carrots, and cook for 2-3 minutes, making sure to cover it with the oil. Then add the celery, fennel and potatoes one ingredients at a time, stirring a few minutes before adding the next. Cook for another few minutes after adding the potatoes, add the cabbage, let cook for 5 minutes, then add the broth, the tomatoes, the parmesan crust if using and a little salt. Give the soup a good stir, then cover the pot, turn the heat to low and let the soup cook for as long as you can manage. Marcella Hazan says 2 1/2 hours, I’d say 1 hour should be more than enough to get a least a decent pot of soup. Add the cannelini beans and stir and cook for another 30 minutes.
Just before serving, remove the cheese crust and add freshly grated parmigiano-reggiano, about 3 tbsp. Only then taste for salt and add more if necessary. Let the soup cool down a bit before serving.

Serves 6-8 (According to Marcella, but for us two it made just enough to serve for dinner twice)

Orange Marmalade

Putting food up for a later enjoyment in winter seems such a reasonable thing to do. And even now that we can actually buy whatever we want all year round and there is little need to put food up, preserving some of the seasonal produce is very satisfying. But I find that I got these things backwards, usually. I am currently thinking about investing in enough large jars to can tomatoes at the end of summer, even though I’d have to buy the tomatoes since I don’t have the space to grow them.
And if I do can something, I usually only make a glass or two that I eat long before winter.
This year I bought organic oranges for my vin d’orange and after draining the vin off, I was left with wine/vodka soaked orange halves that I really did not want to just throw away. Canning is, after all, a sort of resourcefulness. As it turns out, the remnants of making vin d’orange make a really lovely orange marmalade, satisfying both my cravings for something sweet on my toast and my need to not throw that much food away.

Orange Marmalade
Adapted from Put ’em Up, by Sherri Brooks Vinton

If you want to make this without making the vin d’orange, start with fresh oranges, slice them as in the recipe pour 3 cups water over the cut oranges/lemon, cover with a tea towel and set aside over night. 

8 oranges, 1 lemon, leftover from the vin d’orange
sugar

After draining the vin d’orange off, slice the orange and lemon slices very thinly, and place them in a large saucepan. Cut larger slices into halves or thirds. Add about a cup of water to the pan. Once all the wedges are sliced, bring the mixture in the pan to a boil and simmer for about 30 minutes, until the rinds are tender. Cool, cover and set aside over night.
On the next day, measure the cooled mixture and add 50g sugar per 100g orange mixture. Put the saucepan back on the burner and bring the mixture to a boil, stirring constantly. Simmer for about 30 minutes, until the marmalade gels  (to test this, drop a little marmalade on a small plate, let it cool down and check how firm the marmalade is.) Add a teaspoon or two of citric acid, if you have some on hand and want to balance out the sweetness of the marmalade.
Let cool down for 5 minutes, skim foam off and ladle into jars.
To store the marmalade for up to a year, sterilize the jars by boiling a pot of water, add the jars one after the other, boil for a minute or so, remove them from the pot and set them with the opening down on a clean dish towel. Boil the lids in the end. Fill the jars when the marmalade is still hot, put on the lid and set aside to cool down. The jars will be safe to store at room temperature if the lid of the jars are sealed tight and can not be pushed down in the middle.
Store any jars that are not filled completely or sealed correctly in the fridge and consume within a few weeks.

An Easy Belgian Endive Salad

In my parent’s household, eating salad was a must.
I don’t know how my mother did it with four kids, listening to us complaining about the salad we had to eat every single day, after we had already eaten lunch and there was this huge bowl of salad still to be eaten. Maybe once in a few months did my mother let us go without the salad, when she deemed a Chinese stir fry incompatible with salad. We were so happy about those days.
Summer was alright, and winter too, until I started to really dislike beet salad, and all the different bitter winter greens that were seasonal, but just not to my liking. Or to my siblings’.
My mother stuck with this habit for as long as I can remember, and maybe after 10 years she started to see the fruits of her labour. I think my sister and I started to complain less way before my brothers did. There was that time my little sister wanted to finish that huge bowl of by herself, when at the same time the two boys would still sit in front of their salad 15-20 minutes after they had started eating it.
And last year I could not help myself but laugh out loud when my littlest brother told me about summer camp, and how they were never served salad, and on their free day, he’d go to the nearest supermarket to buy one of those already washed/cut salad bowls, pour the dressing that comes with it on top and eat the salad he had missed.
One problem for all of us, the least for my sister, was the bitter salad we had to eat throughout all winter. Endive, napa cabbage, radicchio and all the other varieties that do grow in winter but are just too bitter to be really likeable. And even when we complained less about salad, those bitter greens never really appealed to me.

But this winter I found a way to prepare Belgian endive that makes me want to eat it by the head full, and not share it with anyone else. Caramelizing the endive counteracts the bitterness, but since some of the bitter flavor remains, you don’t end up with a boringly sweet salad. Really, that stuff is addicting. In fact, when a friend came over who was really sceptical about the endive, I hoped to have more for myself and was quite disappointed when she made it clear that the leftovers cannot go onto my plate alone.
This is easy, and if you are not too fond of the winter salad either, you really should give this a try. (And I do hope I can convert you, too)

Caramelized Belgian Endive Salad, with an optional hazelnut crunch

Cut as many heads of Belgian endive in half. Do not remove the bottom part or else they will fall apart when cooking. Rub the cut side with a little sugar, maybe a tablespoon for 2 heads.
Heat a skillet over medium heat, a just a little oil. Place the endive cut side down in the skillet and let brown for a minute or so. Remove from heat once nicely browned, place cut side up on plates and drizzle with a little oil (I used pumpkin seed oil, and have used pistachio, which is insanely good but insanely expensive, but use anything slightly nutty)
Sprinkle a little salt on top, and maybe add a little balsamic vinegar if you like.

If you want to make the hazelnut crunch I have in the picture above, just coarsely chop a few hazelnuts, toast them in the skillet before caramelizing the endive, and add a teaspoon or so of maple syrup. Let it bubble up for a few seconds, then remove from skillet, wipe it out and proceed to make the caramelized endive.

A Vegetarian Christmas

As you may have noticed, I am still absent, sitting in front of my computer, writing this thesis that seems to defeat me. I need to hand it in the week before Christmas, which means after that I really hope to be back and post regularly again.
I just wanted to pop in and tell you what I plan to make for my first Christmas as a vegetarian. In our family, me and my sister are the only ones who dont eat meat, and I am determined to make something great for the two of us.
I experimented with a vegetarian nut loaf once a few weeks ago, but found I still needed to change a few things. I just found this Jamie Oliver recipe on Pinterest, and went back to the magazine that I actually had bought last year. After my first attempt at this I already determined that 2 eggs and about 100g of cheese should be the right amount for this size of nut loaf. Seeing that Mr. Oliver agrees on these two measurements, I think I am going to use his recipe. Maybe add in a little mustard and half a cup of lentils to substitute some of the nuts.
As a starter my mother and I plan on making a salad accompanied with something like this cauliflower cake by Ottolenghi. I have made this before, and it turned out really great. I think I’ll cut this recipe in half, I remember eating nothing but cauliflower cake for about a week after I made it the last time.
If you are looking for a few more ideas on what to make for a vegetarian Christmas, maybe I can direct you to a few other recipes that I have posted here over the last almost two years?

I really loved these legumes d’hiver au vin I posted earlier this year, they are a bit fancy but really easy to make.
This hummus feta souffle would make a lovely starter for the vegetarian in your family, or for everyone else, too.
Or maybe make these crunchy baked acorn squash slices?

Maybe I give the Jamie Oliver nut roast a try before Christmas, and if I do I’d certainly let you know how it turned out, but I just wanted to share it now so that you can decide to make it, too, if you are still looking for a great vegetarian recipe for Christmas.

So I hope to be back soon, until then I wish you lovely pre-Christmas weeks.

Parsnip and Leek Salad with Tofu

I recently realized that I never really introduced my boyfriend around here. He has been the boyfriend for far too long, he has a name, too. So from now on I’ll just call him Michael here. (I actually call him Michi, but that’s probably a bit difficult to pronounce for anyone not from Switzerland, so let’s stick with Michael on this blog).

Yesterday, Michael and I put on our hiking boots, took the train to Solothurn and hiked up the local mountain there, the Weissenstein. The first hour or so we were still below the fog and then in the middle of it. We thought we were out of it every few minutes, until we finally saw rays of light between the trees. Walking into the sun, from under the fog, that makes me think 1) of Plato and 2) an old cliche, but it truly is not just a cliche or a lovely metaphor. Getting out of the literal fog out there, really helped me clear my mind, lift the fog in my brain, so that today I can go back to work and think for once in a while.
We had a late lunch in the sun, hiked up to the top and were rewarded with this view.

And as a gentle reminder that things are real, I burnt my nose in the hour or so of sunlight we had.

Today we are back down below the fog, and back in the kitchen.

This salad was our lunch today. Crunchy radish, soft and squeaky leek and some of the parsnip that did not end up in the soup I made earlier this week, all bound together with a very simple lime-mustard vinaigrette. It made a light and delicioius lunch, and I’d have loved to take some of it to work as lunch the next days but none was leftover.

Parsnip and Leek Salad with Tofu

1 small parsnip, cut into julienne
1 big leek, cut into ribbons
1 tbsp olive oil
1/2 purple radish, if you can find those, or a small bunch of radishes, cut into short julienne
50 g pre-fried tofu, abura-age, cut into strips
4 tbsp lime juice
1 tbsp olive oil
1 heaping tsp Bavarian mustard, or 1 tsp mustard and 1 tsp maple syrup
salt

Heat the olive oil in a skillet on medium heat. Sauté the parsnip until soft, adding a bit of water if needed, to prevent sticking. Add salt to taste. Add the cooked parsnip into a bowl, then sauté the leek in the same skillet, adding a tablespoon or so of water and salt to taste and cook until soft. Add in the bowl with the parsnip. Cook the tofu strips in the same pan, without adding oil or water, until browned. (If you use regular firm tofu, you need to add oil to prevent sticking)
In a small glass, mix together the lime juice, olive oil and vinegar. Salt to taste. Add the radish to the other salad ingredients, drizzle the dressing on top, mix well and top with the tofu strips.

Serves 2 for lunch, or 6 as a side.

Find a printable version here.

Green Bean Salad – A Winter Version

I know, technically we are still in Fall, and we can still get the bounty of Fall produce in the supermarket at the moment. I am still excited about butternut squash and Brussels sprouts. But looking ahead, I know there are going to be times lacking in the produce department. After weeks and weeks of mostly carrots and celery, I’ll be wanting something different. So in the spirit of planning ahead, I already cooked a salad that I’ll probably want to make at least every second day all winter long. You see, all winter long you can still get dried green beans in Swiss supermarkets.
Is is common to cook dried green beans in the US? For the first 22 years of my life I’ve only known them as a side to boiled potatoes and ham, I loved them but the rest of the meal not so much. Especially the potatoes, I really don’t care about boiled potatoes.
But two years ago, in a local restaurant (Tibits, if anyone finds himself in this part of the world sometime) I had a salad of dried green beans, studded with walnuts and cilantro, that was so different and so good, I had to go home and make it myself the next day, a huge bowl full, just for myself.
I would have never thought of combining such a traditional, and somewhat boring, ingredient with cilantro, but once you try it, it just makes sense.

Salad of Dried Green Beans
adapted from Tibits at Home

100g dried green beans
1 small onion, chopped
1 tbsp oil
1/2 cup vegetable broth
1 clove of garlic
100g walnuts, chopped
4 tbsp balsamic vinegar
1 bunch of cilantro, chopped

If you have time, soak the green beans for an hour or two before cooking. It makes them look plumper.
Add the (soaked) green beans to a pot filled with cold, salted water. Bring to a boil, and let simmer for about 25 minutes until soft. Drain and rinse with cold water to cool down. Set aside.
In a skillet, sauté the onion in the oil on medium heat until soft, add the broth and turn the heat off. Let it cool down a bit, then add the garlic and balsamic.
In a bowl, mix the green beans with the onion-balsamic dressing, add the walnuts and cilantro and let sit for 10 minutes before serving.

Serves as many as you want to share it with. 
Printable recipe here.

Walnut "Meat"balls

Hi friends, it has been quiet around here for a little more than a month now, but I am back now, and have lots to share with you from my trip through Europe and Turkey.
If you wish, I can talk about our trip later, but for now, I am just happy to be back. And to be sharing a few of my instagram pictures from the trip.
This sounds so ungrateful, happy to be back, after such a great trip, seeing such an interesting country, and what can I say except that I am very grateful, and I enjoyed this trip a lot. And eventhough I am not one to get homesick, there are certain things I miss once I have been without a home for a while.

I think it is very human to seek the comfort of familiarity. We are creatures of comfort, and a month stuffed with new impressions and changing beds offers little space to just be.

So I loved eating out, trying all the Turkish food we did, and I did love the meze, but still, I really missed cooking. The only cooking we did in the whole month was just in the beginning, when we made a Greek salad in our hostel in Istanbul. And I am so happy to be able to cook again. To be making things, not just consuming. And I think I’ll share some Turkish recipes in the future, but for the past week I craved something different.

These walnut balls are the first things I cooked after coming home that I think is worthy of sharing.
A while ago I turned from almost vegetarian to vegetarian for real, and ever since I feel the need to come up with recipes for things I no longer want to cook and eat.
I did not loads of meatballs before becoming vegetarian. When we both ate meat, my boyfriend and I made Moroccan inspired meatballs once or twice, with cinnamon and dates. I really loved those. But other than that, I dont have many fond memories attached to the consumation of meatballs, but I still do miss them. I miss the possibility of making meatballs when I want to.

This is where these walnut balls come in. I looked at a few recipes for vegetarian meatballs over the last weeks and months, and using nuts in them stuck with me. I kept the flavoring pretty simple this time, some mustard and parsley, a little paprika, salt and pepper. I plan to make them again, and then follow my memories of the Moroccan meatballs we made quite a while ago.

Walnut “Meat”balls

50g walnuts
100g cooked rice
30g dried mushrooms (I used a mix of mu-err and porcini), soaked in water
1 tsp marjoram, or oregano
1 tsp liquid smoke (optional)
1/2 tsp paprika
1/2 tsp salt
1/2 tsp pepper
2 tsp whole grain mustard
a small handful parsley
3 tbsp quick cooking polenta (dry, not cooked, or substitute breadcrumbs)

Making these is really easy, measure out all the ingredients, add everything except the polento into a food processor and process until the mixture is not smooth but has the texture of coarse sand. Stir in the polenta using a spoon.
Form the mixture into little balls, and pan-fry them in a little oil until they are crispy on all sides.

Makes around 15 small balls.